Top 5 iPhone Games

Do you usually spend time waiting for a bus… without anything to do?. And how about when there is nothing on TV? what do you do?. Or… say… you’ve just finished that book you’ve been reading for months, and you have no clue what to do with your spare time!.

If you answer ‘yes’ to any of the above questions, then this short list of Top 5 iPhone Games is just for you!.
Fix It Felix Junior, the game!
Fix-It Felix Jr.
I fell in love with this title. It’s a simple old-shool videogame, in which you need to fix the building, while Wreck-It Ralph breaks everything. It took me about 5 minutes to get used to the onscreen controls… you should give it a shot!.



Grand Theft Auto for iPhone
Grand Theft Auto, Vice CIty
Ahhh… who didn’t get to play GTA 1 on an old Pentium PC?. And how about GTA 2?. Well… guess what… GTA has reincarnated as an iOS videogame. It’s about 4.99 dollars, but it’s worth every penny. Most definitely!


Talking Carl for iOS
Talking Carl
What can i say about this…. Red, as i call it, is my friend. He’s not smart as Siri, so.. he will just repeat whatever you say. But it’s really fun… and kids do love him. Download it, and tickle him. It’s worth it!


Tesla Toy iPhone Game
Tesla Toy
Do you own a Tesla Coil?. Me neither. But i do have an app that looks the same way, so to speak. This app emulates the behavior of a Tesla Coil. You should see it running on an iPad, it’s pure eye candy.


Talking Ted iOS Game
Talking Ted (Lite!)
This app doesn’t compete with Talking Carl, since Ted doesn’t repeat whatever you say. However, since Ted is a talking bear, this app has a couple recordings of the toy, doing several things (such as drinking alcohol). The lite version is free.. so… give it a shot!


Using NSLocalizedString with a dictionary stored inside a bundle

We’ve seen before how to create an iOS Assets bundle. Today, we’ll try to localize a string, using a dictionary stored in a bundle. In order to do so… we’ll rely on the following helper method:

[cc lang=”objc”]
@interface LABundles
+ (NSBundle*)someResourcesLocalizationBundle
@end

@implementation LABundles
+ (NSBundle*)someResourcesLocalizationBundle
{
static NSBundle* someResourcesLocalizationBundle = nil;

if ( someResourcesLocalizationBundle == nil )
{
// This double check increases efficiency. Don’t you get bored of asking the same thing twice?.
@synchronized(self)
{
if ( someResourcesLocalizationBundle == nil )
{
// Figure out the current language.
NSUserDefaults* defs = [NSUserDefaults standardUserDefaults];
NSArray* languages = [defs objectForKey:@”AppleLanguages”];

NSString* currentLanguage = [languages objectAtIndex:0];

// Map the current language’s folder within the bundle
NSBundle* bundle = [NSBundle someResourcesBundle];
NSString* path = [bundle pathForResource:currentLanguage ofType:@”lproj”];

// Okay, let’s go with the default bundle
if ( path == nil )
{
someResourcesLocalizationBundle = bundle;
}
// Bingo!
else
{
someResourcesLocalizationBundle = [NSBundle bundleWithPath:path];
}

[someResourcesLocalizationBundle retain];
}
}
}

return someResourcesLocalizationBundle;
}
@end
[/cc]

 
What’s that all about?. Well… it turns out that order to resolve localized strings, first of all we need to figure out what’s the device’s language.

After that, we need to load a NSBundle object mapped to the folder inside the bundle, which contains the localized strings file. And then we can begin talking about resolving a localized string.

The code pasted above has been tested, of course!. But how do you use it ????

Supposing that you need to localize the string ‘Testing1’, and that you intend to use a dictionary named ‘InfoPlist.strings’, you need to do the following:

[cc lang=”objc”]
[[NSBundle someResourcesLocalizationBundle] localizedStringForKey:@”Testing1″ value:nil table:@”InfoPlist”]
[/cc]

Of course, you can customize that. If your dictionary file is named ‘Localized.strings’, you don’t even need to specify the ‘table’ parameter.

I hope you find this useful!

Loading UIImages from files stored inside a bundle

We’ve learnt before how to make an iOS Assets Bundle. In this mini post… we’ll learn how to learn images, stored in bundles. Okay.. this one is super simple:

[cc lang=”objc”]
UIImage* twitterBtnImage = [UIImage imageNamed:@”SomeResources.bundle/twitter-button.png”];
[/cc]

Of course, you need to have the ‘SomeResources’ bundle in your project. That’s it!

Loading NIBs stored inside a bundle

When does it make sense to store your NIBs inside a bundle?. As we’ve discussed before… this becomes handy when you’re distributing a framework which has some custom NIB files.

But wait…. how do you tell a UIViewController to load its nib file from a bundle?. Short answer… we’ll rely on UIViewController’s ‘initWithNibName: bundle:’ constructor.

Before doing that… we need to take care about a small detail, which is, how to load a NSBundle object (to pass on as the ‘bundle’ parameter).

We’ll show you the required code below, encapsulated into a nice helper class:

[cc lang=”objc”]
@interface LABundles
+ (NSBundle*)someResourcesBundle;
@end

@implementation LABundles
NSString* const kSomeResourcesBundleName = @”SomeResources.bundle”;

+ (NSBundle*) someResourcesBundle
{
static NSBundle* someResourcesBundle = nil;
if ( someResourcesBundle == nil )
{
@synchronized(self)
{
if ( someResourcesBundle == nil )
{
NSString* bundlePath = [[[NSBundle mainBundle] resourcePath] stringByAppendingPathComponent:kSomeResourcesBundleName];
someResourcesBundle = [[NSBundle bundleWithPath:bundlePath] retain];
}
}
}

return someResourcesBundle;
}
@end
[/cc]

Finally, in order to alloc an UIViewController, and load its nib from the SomeResources bundle, we need to do the following:

[cc lang=”objc”]
SomeViewController* someVC = [[SomeViewController alloc] initWithNibName:NSStringFromClass([SomeViewController class])
bundle:[LABundles someResourcesBundle]];
[/cc]

That’s it!. SomeViewController should be loading its nib file from the someResources bundle.

Making an iOS Assets Bundle

An iOS Bundle is just a folder which contains resources. Roughly speaking,  it allows you to store any resource you might need: images, nibs, or localized string files.

Why would you create an application bundle?. What’s that good for?.

Suppose you have a framework of your own. And… suppose that your framework has several UIViewController which require custom images. OR, suppose that you need to load different images dynamically, within your framework’s code.

You can’t include those resources inside an iOS framework. So… that’s where the bundles come in!.

Check out the Facebook SDK. Yup. It contains a bundle with few image resources.

[Step #1] : Adding a Bundle Target 

Let’s add a new target to our project, which will be the one responsible of generating the bundle.

First of all, we need to click over the project name in the navigator (1), and afterwards, over the ‘add target’ button at the bottom (2):

UpdatingTarget

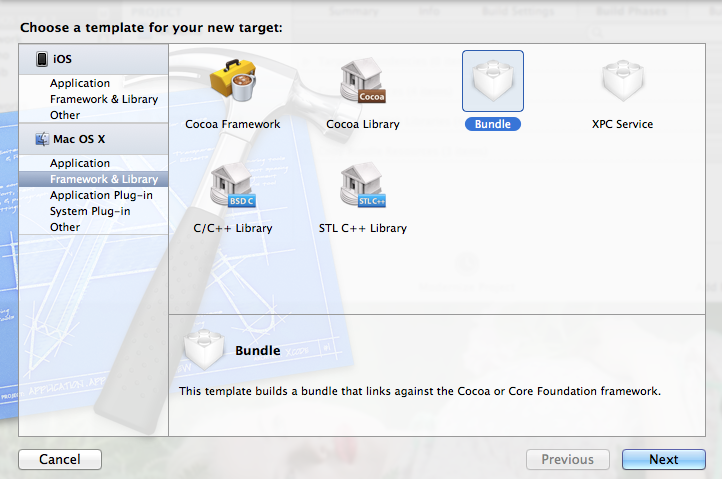
You can find the ‘Bundle’ target in the following path: ‘Mac OSX >> Framework & Library >> Bundle’:

AddingBundle

Did you notice that we had to use the ‘Bundle’ target-template located inside MacOSX section?. Aaaand… did you notice that there is no Bundle target-template inside the iOS section?.

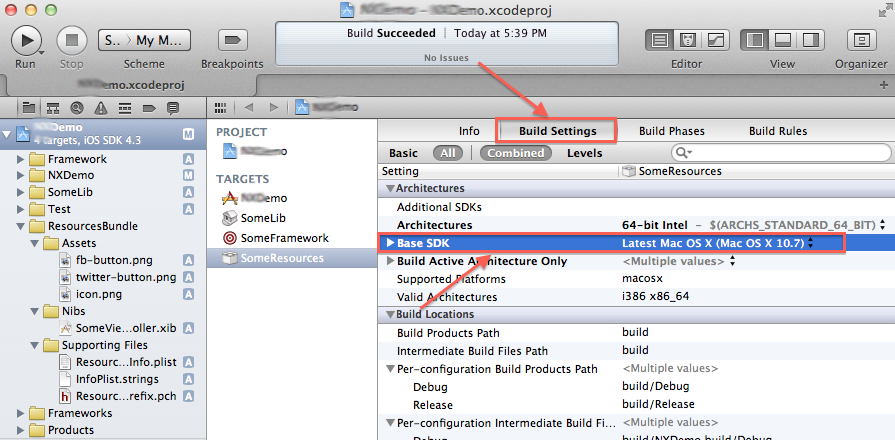
OSX and iOS bundles have a slightly different structure. We can use any of them both. But since we’re working on iOS, let’s switch to its own Bundle structure.

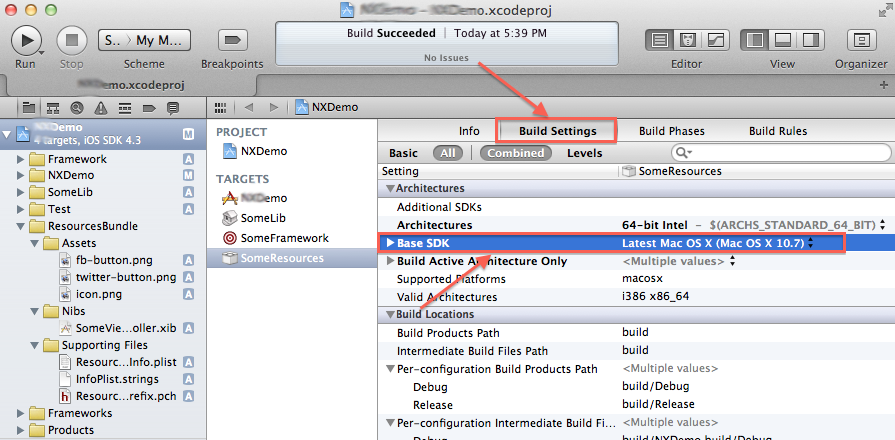
We need to change the ‘base sdk’ Build Setting for our new SomeResources target, as follows:

UpdatingTarget

Let’s update the BaseSDK. Instead of Latest Mac OSX, please, click over that combo and select ‘Latest iOS’.

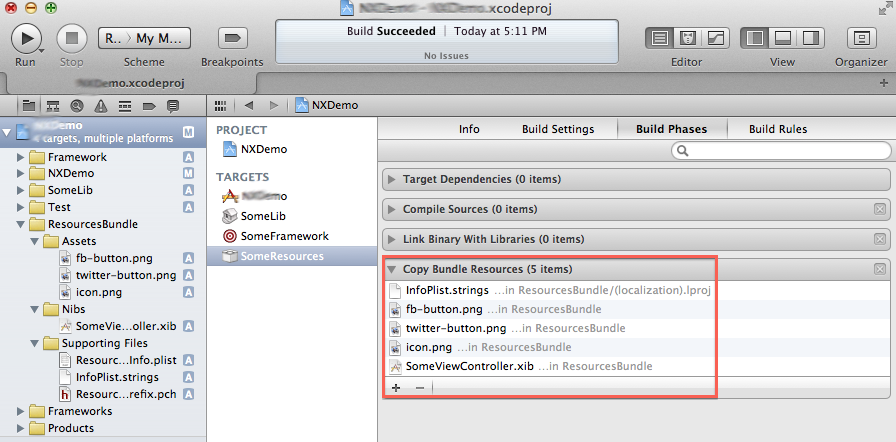
Allright!. It’s time to edit the Build Phases section of our Bundle. We’ve named our new target as ‘SomeResources’. We just need to add all of our resources into the ‘Copy Bundle Resources’ section, as shown below:

AddingAssets

Note that, for this particular example, we’re exporting three PNG images, a NIB file, and an InfoPlist.strings file. We’ll see, later on, how to load these files.

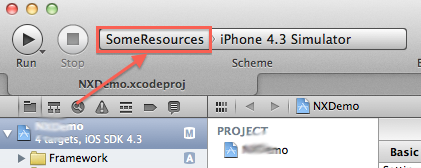
In order to generate the bundle, we just need to select the ‘SomeResources’ schema:

SelectingSchema

Once we have the ‘SomeResources’ schema selected, we must hit “build” in order to generate the bundle file.

Your build-output folder should look as follows, assuming you’re in debug mode. ‘SomeResources.bundle’ is ready to be distributed:

BuiltBundle


[Step #2] : Including SomeResources.bundle into a Sample project 

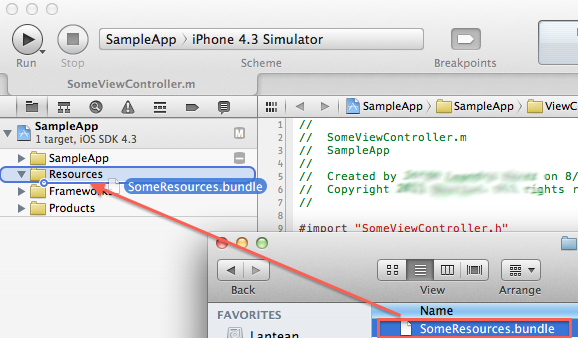
How do we manage to import this new bundle into a new project?. Simply drag & drop the ‘SomeResources.bundle’ file into your target app’s Resources folder, as shown below. That’s all you need to do.

ImportingBundle

Up next… we’ll learn how to:

I hope you found this mini guide useful… somehow!.
Have fun!.

%d